
Aged Columns
I started this project on Monday. The deal is to paint 4 stone columns so they match in color the marble around the fireplace (not shown in picture) and to make them look very old. In the picture the two columns furthest away have been completed.
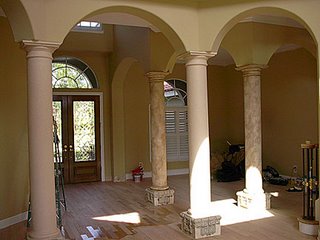
The pedestals that the columns sit on have been changed from what they were. They originally were sitting on wood and the wood pedestal was actually smaller than the base of the column so it looked kinda funny. Now as you can see the pedestals have been built out some and faced with marble and some sculpted decorative type tile. (Which I have to paint to match the columns)
Anyway, I assumed the columns were painted in oil as the wood base seemed to be and they were both a satin white. (Painting stone columns white is not a good idea. It just does not do the columns any justice at all.) So the first thing i did was to prime them with a product by Zinsser called 'Cover Stain', its an oil based primer. Its an excellent primer and I use it on a regular basis, especially when I am not sure what it is I am priming over. I have found that this primer is the only one I can count on to adhere to oil paint. Yes, I know, the Bin 123 and other waterbased primers will say they adhere well to oil paint but in my experience they do not.
Even though the Cover Stain is oil based it dries as fast as an acrylic primer and once it cures it ain't coming off.
So after I primed I based coated with a color that I thought would give me the base coat color of the marble I was trying to match. Priming and base coating was the first day.
The next day I started on the first column. Now sometimes my plan does not go as planed. I tried for almost 3 hours to get the column to look the way I wanted it to but could not. So I gave up and base coated over what I did to get it back to a starting point and moved to another column. I used a different technique and that worked great so at that point I was off and running. I was able to get 2 columns completed the second day and today finished up the last two and sealed them.
I use a product called, 'Diamond Elite' it is made by Varathane and is a clear waterbased polyurethane made for floors but I use it on walls and cabinetry all the time.

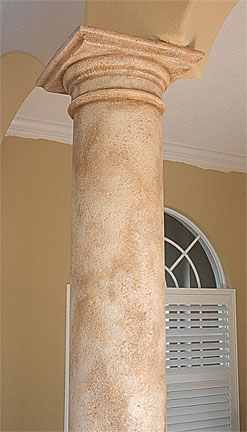
So here is the aged look above. To get it I used a dark warm gray and a medium to dark toned brown mixed to gether. I do not mix up a batch of the color and then paint with it. What I do is take my brush and dip it in one can and wipe that off in the paint tray, then dip the brush in the other can and mix the two colors together in the paint try.
I mix the colors like that so that each time I mix up a small amount it has a little different mixture of each color. that way the hue and shade of the color varies slightly around the column. It makes it more interesting to do it that way.
Once I mixed up a small amount of paint I get my brush very wet with water. I need to have the paint extremely runny because I want to push it into all the pock marks in the column so with the brush very wet and spread the paint on the column pushing it into the pock marks. Then I immediately take a cotton rag and wipe off almost all the paint on the surface of the column leaving the pock marks filled. If you look at the photo above you can see the pock marks and how the dark paint filled them.
I am working in areas of about 15-18 inches by 20 inches and sometimes larger. I get the whole column done like this and let it dry. then I take an off white and dry brush it over the column and leave the muted veining look you see. then I take a brush with the darker paint and go into all the seams at the top and bottom of the column. Then once dry I seal it.
They look very much like they have stood there for hundreds of years.

The pedestals that the columns sit on have been changed from what they were. They originally were sitting on wood and the wood pedestal was actually smaller than the base of the column so it looked kinda funny. Now as you can see the pedestals have been built out some and faced with marble and some sculpted decorative type tile. (Which I have to paint to match the columns)
Anyway, I assumed the columns were painted in oil as the wood base seemed to be and they were both a satin white. (Painting stone columns white is not a good idea. It just does not do the columns any justice at all.) So the first thing i did was to prime them with a product by Zinsser called 'Cover Stain', its an oil based primer. Its an excellent primer and I use it on a regular basis, especially when I am not sure what it is I am priming over. I have found that this primer is the only one I can count on to adhere to oil paint. Yes, I know, the Bin 123 and other waterbased primers will say they adhere well to oil paint but in my experience they do not.
Even though the Cover Stain is oil based it dries as fast as an acrylic primer and once it cures it ain't coming off.
So after I primed I based coated with a color that I thought would give me the base coat color of the marble I was trying to match. Priming and base coating was the first day.
The next day I started on the first column. Now sometimes my plan does not go as planed. I tried for almost 3 hours to get the column to look the way I wanted it to but could not. So I gave up and base coated over what I did to get it back to a starting point and moved to another column. I used a different technique and that worked great so at that point I was off and running. I was able to get 2 columns completed the second day and today finished up the last two and sealed them.
I use a product called, 'Diamond Elite' it is made by Varathane and is a clear waterbased polyurethane made for floors but I use it on walls and cabinetry all the time.
So here is the aged look above. To get it I used a dark warm gray and a medium to dark toned brown mixed to gether. I do not mix up a batch of the color and then paint with it. What I do is take my brush and dip it in one can and wipe that off in the paint tray, then dip the brush in the other can and mix the two colors together in the paint try.
I mix the colors like that so that each time I mix up a small amount it has a little different mixture of each color. that way the hue and shade of the color varies slightly around the column. It makes it more interesting to do it that way.
Once I mixed up a small amount of paint I get my brush very wet with water. I need to have the paint extremely runny because I want to push it into all the pock marks in the column so with the brush very wet and spread the paint on the column pushing it into the pock marks. Then I immediately take a cotton rag and wipe off almost all the paint on the surface of the column leaving the pock marks filled. If you look at the photo above you can see the pock marks and how the dark paint filled them.
I am working in areas of about 15-18 inches by 20 inches and sometimes larger. I get the whole column done like this and let it dry. then I take an off white and dry brush it over the column and leave the muted veining look you see. then I take a brush with the darker paint and go into all the seams at the top and bottom of the column. Then once dry I seal it.
They look very much like they have stood there for hundreds of years.
Comments
Post a Comment