
Paint A Horizontal Stripe Pattern In Room
I finished the stripe pattern I have been working on. It came out really nice and the client loved it.
In order to do this project there was quite a bit of prep work. The walls that have the stripes on them had wallpaper. The clients took the wallpaper off themselves. There were quite a bit of holes and rips and other gouges in the wall that first had to be repaired.
Typically when one hires a professional to take down wallpaper the person will strip the wall and repair any damage then prime the wall so it is ready to go.
So that was not done in this case so I had to do that myself. The first thing I do in these cases is to sand down the entire wall with my 'mouse' hand held sander. I clean up the edges of all the tears and holes. Then I fill the holes with M and H Ready patch. The smaller holes, tears and gouges I can fill with joint compound.
The difference is joint compound is softer than the ready patch and not good for larger holes as it will crack.
So I go over the entire wall area and let that dry for a day. Then I re-sand the entire wall hoping I got all the holes. Of course with this wall and so many places I missed a few so I get those. When all is dry I sand again then prime. After you prime with a good primer there will be some spots that might need some more attention so I take care of that. Then I prime again. Lots of work just to get to the place where you can start putting paint on the wall.
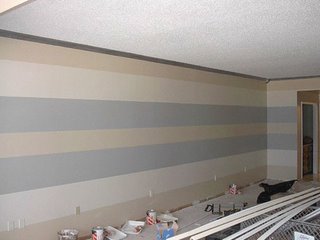
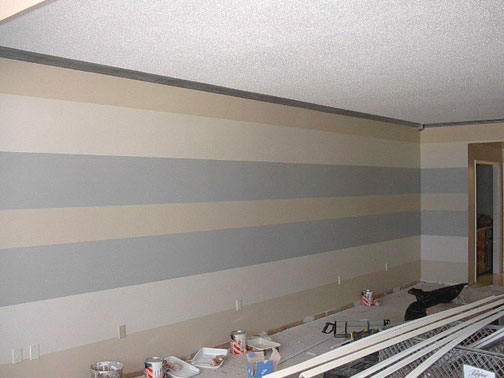
So lets look at the wall again.
I first painted the entire wall with one coat of the tan color. I did this for a couple of reasons. The first is I wanted to get some color on the wall. I was also concerned about seeing an edge mark with painting the stripes. Each layer of paint when dried will have a thickness to it. So if you paint two layers of paint then try to butt up against that with two other layers there is a good chance you will see a line there. So hoping to minimize that effect I opted to paint the wall one of the three colors first. I also wanted to do the job in the least of amount of time possible. When you are doing stripes to get the edge line as clean as possible you need to use tape. I use the blue 'safe release' tape and would not reccomend using anything else. The regular blue painters tape will lift paint off the wall.
So first I paint the wall one coat of tan color. Then I taped off the two off white stripes and painted them in with two coats. I then taped off the center tan stripe and gave it a second coat. (I only needed to paint one coat on this stripe after I taped it off because I had already painted the entire wall this color.)
So now I have three stripes done, the two off white and the center tan one. I did it this way because I have to wait over night for the paint to dry before I can tape off the other stripes. Even using the safe release I give paint an over night dry before taping on to it.
Now the next day I taped off the gray stripes and the top and bottom tan stripes and paint them in. Here you can see the taping and painting of the gray stripes.

In order to paint in the gray stripes I needed to tape on the off white stripes so that is why they needed to dry over night.
In order to paint in stripes you need to be able to mark off the edges of the stripes in a level straight line. In order to do that I use a laser level.
Mine is a 'David White' laser level and costs about $150.00. It comes with an eight foot pole you can attach the laser to. With that you can slide the laser up and down and clamp it at any height thereby you can set it precisely where you want it on the wall. It has a horizontal line and a vertical or both at one time. It has a self leveling feature which is invaluable. It levels itself on the wall so you don't need a level to to that.
Once I determine the width of the stripes I mark off the measurements on the wall. Then with the laser level you just line up the red line of the laser light on each mark and it gives you a level horizontal line across the wall. You don't need to pencil off this line, I just leave the light on and tape right to it. Its really a nice tool to use.
After the first stripes are done you don't need the laser level anymore.
For the gray stripes and the upper and lower tan stripes I simply tape along the edge of the off white stripes over lapping less than a 1/16th of an inch.
I had previously painted the crown molding a brushed nickel look with metallic paint. You really can't tell from the picture so you will have to trust me on that. The procedure on that was to paint the crown first in a dark gray satin paint. Then I mixed some metallic silver with some metallic bronze to darken it some and brushed it over the dark gray paint.
In order to do this project there was quite a bit of prep work. The walls that have the stripes on them had wallpaper. The clients took the wallpaper off themselves. There were quite a bit of holes and rips and other gouges in the wall that first had to be repaired.
Typically when one hires a professional to take down wallpaper the person will strip the wall and repair any damage then prime the wall so it is ready to go.
So that was not done in this case so I had to do that myself. The first thing I do in these cases is to sand down the entire wall with my 'mouse' hand held sander. I clean up the edges of all the tears and holes. Then I fill the holes with M and H Ready patch. The smaller holes, tears and gouges I can fill with joint compound.
The difference is joint compound is softer than the ready patch and not good for larger holes as it will crack.
So I go over the entire wall area and let that dry for a day. Then I re-sand the entire wall hoping I got all the holes. Of course with this wall and so many places I missed a few so I get those. When all is dry I sand again then prime. After you prime with a good primer there will be some spots that might need some more attention so I take care of that. Then I prime again. Lots of work just to get to the place where you can start putting paint on the wall.
So lets look at the wall again.
I first painted the entire wall with one coat of the tan color. I did this for a couple of reasons. The first is I wanted to get some color on the wall. I was also concerned about seeing an edge mark with painting the stripes. Each layer of paint when dried will have a thickness to it. So if you paint two layers of paint then try to butt up against that with two other layers there is a good chance you will see a line there. So hoping to minimize that effect I opted to paint the wall one of the three colors first. I also wanted to do the job in the least of amount of time possible. When you are doing stripes to get the edge line as clean as possible you need to use tape. I use the blue 'safe release' tape and would not reccomend using anything else. The regular blue painters tape will lift paint off the wall.
So first I paint the wall one coat of tan color. Then I taped off the two off white stripes and painted them in with two coats. I then taped off the center tan stripe and gave it a second coat. (I only needed to paint one coat on this stripe after I taped it off because I had already painted the entire wall this color.)
So now I have three stripes done, the two off white and the center tan one. I did it this way because I have to wait over night for the paint to dry before I can tape off the other stripes. Even using the safe release I give paint an over night dry before taping on to it.
Now the next day I taped off the gray stripes and the top and bottom tan stripes and paint them in. Here you can see the taping and painting of the gray stripes.
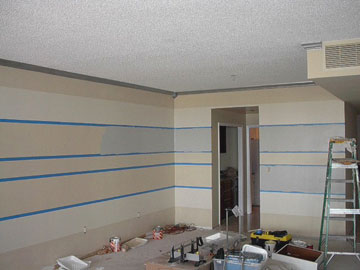
In order to paint in the gray stripes I needed to tape on the off white stripes so that is why they needed to dry over night.
In order to paint in stripes you need to be able to mark off the edges of the stripes in a level straight line. In order to do that I use a laser level.
Mine is a 'David White' laser level and costs about $150.00. It comes with an eight foot pole you can attach the laser to. With that you can slide the laser up and down and clamp it at any height thereby you can set it precisely where you want it on the wall. It has a horizontal line and a vertical or both at one time. It has a self leveling feature which is invaluable. It levels itself on the wall so you don't need a level to to that.
Once I determine the width of the stripes I mark off the measurements on the wall. Then with the laser level you just line up the red line of the laser light on each mark and it gives you a level horizontal line across the wall. You don't need to pencil off this line, I just leave the light on and tape right to it. Its really a nice tool to use.
After the first stripes are done you don't need the laser level anymore.
For the gray stripes and the upper and lower tan stripes I simply tape along the edge of the off white stripes over lapping less than a 1/16th of an inch.
I had previously painted the crown molding a brushed nickel look with metallic paint. You really can't tell from the picture so you will have to trust me on that. The procedure on that was to paint the crown first in a dark gray satin paint. Then I mixed some metallic silver with some metallic bronze to darken it some and brushed it over the dark gray paint.
I was looking for the perfect inspiration picture to convince my brother to let me paint gray & tan stripes in his home and came across this on Google. Thank you! This is perfect.
ReplyDeleteGreat, I hope it works out.
Delete