
Painting Crown Molding And Beams To Look Like Wood
I finished up today on a job I had started last week. In fact I had posted about the beginning of that job on a Feb 4th post but I think I'll use some of the same pictures here so if you are interested you would not have to go back to see those.
With dealing with new wood construction the first step you have to take is to the prime the wood, the second step after the primer has dried is to then fill the all the nail holes and sand smooth.
There is always a ton of nail holes with this kind of construction. Fortunately most are small. In the first photo I have primed the mantel areas and tv niche. This entire wall is new, the stack stone and brick as well as the mantel. In the second photo you tend to get an idea about nail holes.
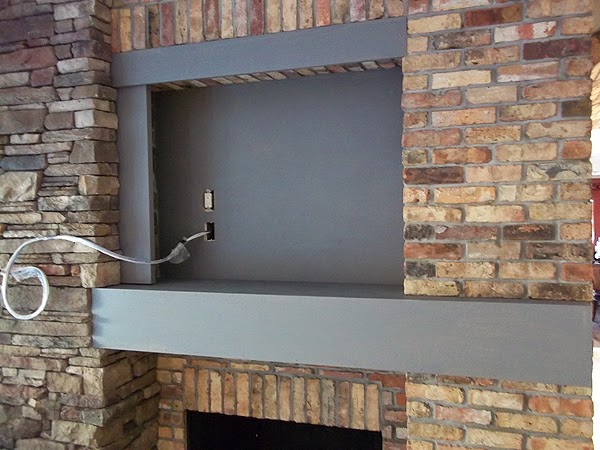

After I sand down the patching material I apply the base coat of paint for the wood grain. Ordinarily this is where the client says, "Wait stop! You are suppose to make it look like wood." I used this color as a base coat so the end product would go well along side the brick.

Once the tv is mounted in the niche there is a pocket sliding door that will cover it when not in use.
The next photo shows how I have started the process of making the niche look like wood.

The last photo on this area shows the completed look. The pocket door comes out great and wood tone goes really well with the brick.

If you will notice the ceiling in the series of pictures above show that it is arched. Before the remodel the ceiling was a standard 8 foot, flat across.
In the next photo you can see how the foyer ceiling was also opened up. The red arrow shows the original height of the ceiling before it was opened up. The beams were added and I painted them to look like wood.

The next photo shows the ceiling in the living room which is approximately 20 feet by 20 feet. This ceiling was also opened up. In the photo below you can see the completed work. The red arrow in the lower right of the picture shows the original ceiling height. At the peak of the ceiling now it is 40 inches higher than when it was a flat ceiling.

A few nail holes to deal with when I first started, which always makes working over your head more of a challenge. I had also taken off the fan blades and painted them to match the beams.

Trust me, you want this kitchen. Look at that gorgeous ceiling. It too was a standard flat 8 foot in height then opened up and barrel rolled and lined with brick. Then the wood molding was installed and I painted it to match all the other wood work I had painted. The length of the molding on each side is 18 feet and ends are almost 10. This is a big kitchen. It is a real challenge to paint a wood grain on a piece of wood that is 18 feet long. I had to use a step stool to reach it also. The challenge is you want the wood grain to flow the entire length of the wood with out having any start and stop overlaps made by the brush. Gotta work fast.


All in all a good job and the clients love it.
With dealing with new wood construction the first step you have to take is to the prime the wood, the second step after the primer has dried is to then fill the all the nail holes and sand smooth.
There is always a ton of nail holes with this kind of construction. Fortunately most are small. In the first photo I have primed the mantel areas and tv niche. This entire wall is new, the stack stone and brick as well as the mantel. In the second photo you tend to get an idea about nail holes.
After I sand down the patching material I apply the base coat of paint for the wood grain. Ordinarily this is where the client says, "Wait stop! You are suppose to make it look like wood." I used this color as a base coat so the end product would go well along side the brick.
Once the tv is mounted in the niche there is a pocket sliding door that will cover it when not in use.
The next photo shows how I have started the process of making the niche look like wood.
The last photo on this area shows the completed look. The pocket door comes out great and wood tone goes really well with the brick.
If you will notice the ceiling in the series of pictures above show that it is arched. Before the remodel the ceiling was a standard 8 foot, flat across.
In the next photo you can see how the foyer ceiling was also opened up. The red arrow shows the original height of the ceiling before it was opened up. The beams were added and I painted them to look like wood.
A few nail holes to deal with when I first started, which always makes working over your head more of a challenge. I had also taken off the fan blades and painted them to match the beams.
A closer look at the crown molding.
All in all a good job and the clients love it.
Hi Robert. Amazing work! I was wondering how you ended the brush strokes against a wall and etc. BTW I downloaded the garage book and hope to start this spring.
ReplyDeleteMug, Thanks for the purchase of my tutorial. I always use a lot of low tack tape when I do my wood graining projects. I use the tape on the wall all around the beams, that way when any of the brush strokes hit the end of the beam the paint doesn't get on the wall.
ReplyDeleteAs you will see when you read the tutorial I use a lot of tape on the garage doors to so that I can create a smooth looking grain without start and stop marks.
I use the low tack tape or the tape that says it is for delicate surfaces. You can get it at Home Depot. I actually have pictures of it in the tutorial so can see what exactly I am talking about.
Hope this helps.