
Painting a White Bathroom Vanity to Look Like Wood
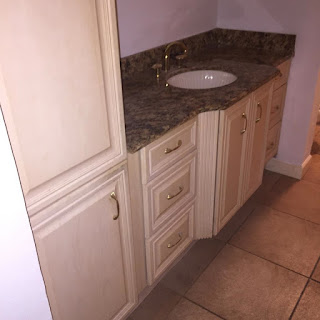
I have been working on a bathroom vanity this past week. The vanity was an off white and I am painting to look like a dark walnut wood.
Here are some before pictures.


The white arrows indicate the direction the wood grain will go. The taped off areas will get the wood grain going in the opposite direction. I start a wood grain paint stroke on the tape and end on the tape. That way there is not any start and stop paint stroke marks on the doors.


Notice how nice and crisp the wood grain stops. This is why I use the taping off method.

Here are a few photos of the finished doors.

This next photo is really a great shot of how wonderful the wood grain painting came out. Unless you knew this door started out an off white you would never know it's not wood from the get go.


Painting the framework on cabinets is always a challenge. One of the main aspects you have to deal with are the hinges. When I take off the doors I number each hinge and I number the exact hole it goes in so the same hinge goes back into the same spot.
The other thing is when you take off the hinges you need to be able to get them back on in the same position on the frame. You might think why take them off at all. The reason is with most hinges you can not paint a good wood grain with them on the frame. The hinge will interrupt the flow of the paint stroke.
So I take them off if that is the case. Now look at this next picture. When I paint on the primer I leave the hinges on. That way when I take off the hinge it leaves a footprint of where it was. The white arrow shows the screw head and the green arrows show where I have painted right up the hinge.

In the next picture you can see the slot where the screw goes that holds the hinge to the door. It is adjustable up and down. So what you want to do is make sure it goes back on in the same spot and not up or down any otherwise the door will not go back on correctly.

In the next photo it shows where I have taken off the hinge and exposed the footprint of it on the frame.


Did I mention this job was in a condo on Indian Rocks Beach, FL. This was the view out from the porch yesterday morning. The water is so clear right now. On this part of the beach there is hardly anyone there all day long. It's just like having your own private beach right on the Gulf of Mexico. Providing it's not totally cloudy (which it hardly ever is) you get a beautiful sunset every evening. Nice.

Here are some before pictures.


The first step is to clean all the surfaces to be painted. After taking all the doors and drawer fronts off I clean the framework. Cabinets in baths will have soap on them so you have to be really good about getting all surfaces really clean and soap free. Then I do a light sanding, more of wiping the surface with a 150 or 220 grit sandpaper just to scuff it up a bit.
When that is all done I prime the surfaces to be painted. I use a dark gray primer then on this job I used a SW color called Toasty for the base coat of paint.
Once the base coat is dried I start to paint the wood grain on the doors. The next two photos show how I tape off the doors. The first one is actually a drawer front but I paint them the same way.

The white arrows indicate the direction the wood grain will go. The taped off areas will get the wood grain going in the opposite direction. I start a wood grain paint stroke on the tape and end on the tape. That way there is not any start and stop paint stroke marks on the doors.

The next two photos show how I have taken off the first taping and I have finished the wood grain pattern in that direction. So you can see how the next step is to paint in the wood grain on the end in the opposite direction.

Notice how nice and crisp the wood grain stops. This is why I use the taping off method.

Here are a few photos of the finished doors.


Two close-ups of the work. Just look at how nice the corners come out using these steps.


Painting the framework on cabinets is always a challenge. One of the main aspects you have to deal with are the hinges. When I take off the doors I number each hinge and I number the exact hole it goes in so the same hinge goes back into the same spot.
The other thing is when you take off the hinges you need to be able to get them back on in the same position on the frame. You might think why take them off at all. The reason is with most hinges you can not paint a good wood grain with them on the frame. The hinge will interrupt the flow of the paint stroke.
So I take them off if that is the case. Now look at this next picture. When I paint on the primer I leave the hinges on. That way when I take off the hinge it leaves a footprint of where it was. The white arrow shows the screw head and the green arrows show where I have painted right up the hinge.


In the next photo it shows where I have taken off the hinge and exposed the footprint of it on the frame.

The white arrow shows how much of the hinge footprint I leave after the base coat goes on. This way when I re-install the hinge it will go back in the exact position it was in.

The next photo shows the framework painted to look like wood.

I got all the framework complete yesterday and I need to seal it with a clear sealer today and put back on the doors and drawer fronts, touch up the walls, then I will be done. I wish I could take some better pictures of this job but in the small space it's hard to get any. I will try again today and maybe I'll get some better ones.

In the next photo the white arrows show how I number the drawers and when I take off the drawer front I number the back of that too with an arrow indicating which way was the top of the drawer front. In that manner I assure I will get the right drawer front on the right way. Believe me it makes a difference.

Did I mention this job was in a condo on Indian Rocks Beach, FL. This was the view out from the porch yesterday morning. The water is so clear right now. On this part of the beach there is hardly anyone there all day long. It's just like having your own private beach right on the Gulf of Mexico. Providing it's not totally cloudy (which it hardly ever is) you get a beautiful sunset every evening. Nice.

What did you use for the wood grain after the base coat?
ReplyDeleteFor this job I used two different color browns. The first coat of wood grain I used Sherwin Williams 'Java'. Then I used SW 'Turkish Coffee' for the second and darker color grain. I used the exact same technique on cabinets as I use on garage doors. I have an exhaustive and lengthy tutorial on painting a garage door to look like wood. You can check it out from the main menu above. Hope this helps,
Delete