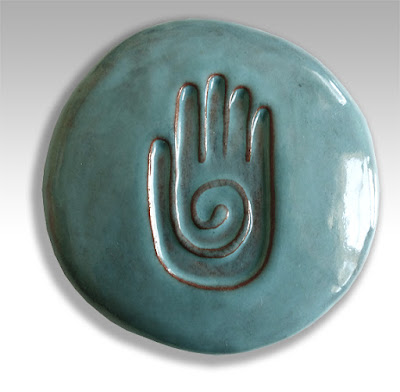
I recently got started on some new symbols for my Etsy Shop. One of my best selling symbols is the Native American Healer's Hand symbol.
The Healer's Hand is also known as the Shaman's Hand. It is an ancient symbol of healing and protection. The symbol is known for its therapeutic energy and is displayed for its curative powers. Displaying the symbol in your home also brings good health, good luck and happiness.
The Healer's Hand consists of a hand with a spiral palm. The spiral is an ancient symbol of eternity, it represents the universal Spirit in all things.
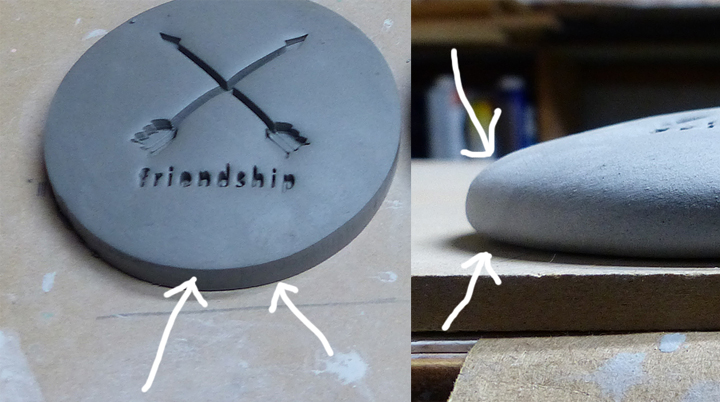
I was looking to make a symbol for friendship. All the symbols I have are from ancient cultures. I looked for quite a while and did not find a specific symbol for friendship until I found the crossed arrows symbol from the Native American plains culture.
I had found a few 'fake' symbols for friendship but I only like to use authentic images. So I was very happy to have found this crossed arrows symbol and it will make a nice companion to the Healer's Hand.
Native American Crossed Arrows Friendship Symbol
Each symbol starts off being created from a 25 pound block of white earthenware. In my clay studio/garage I lay out the clay block on my work bench. Then using the wire cutter I slice off a predetermined thickness of the block. The block of clay shown in the photo below is almost gone, you can see the wire cutter laying on top of what is left of it. The wire cutter works great. It has a small wooden handle on each end and you just push the wire through the clay and slice off what you need.

For these symbols I slice off about an inch and half thickness. I lay that on my work bench and then take the wire cutter and cut that in half, then I take each of those pieces and cut them in half. So I end up with 4 roughly small blocks of clay. In the photo below you can see two of the small blocks, center, next to the plastic bag. You can also see two symbols resting on my drying sheet. The drying sheets I use are half inch drywall board cut to 12 by 24 inches. In the upper right of the photo you can see the edge of my kiln.
I choose the circle as the shape for all my ancient symbols. The circle itself is the oldest symbol and used in all cultures throughout the history of man. The circle is generally symbolic of wholeness, eternity, completion, vitality and perfection. To all ancient cultures the circle also represents the Divine life-force energy or Spirit that keeps our reality in motion.
In order to get the clay to flatten out in a circle shape I take one of the small blocks and shape it into a ball. It's about the size of a baseball or slightly less than that.
Once I have the ball shape I take the clay and throw it down on my work bench. This flattens out one side. I pick it up and throw it down on the other side. I keep doing this, picking it up and throwing it down alternating sides until it spreads out in a nice circle shape as you can see in the photo below.
I keep throwing the clay until it spreads out to about a 5 inch circle. Then I take the symbol stamp and that you can see in the next two photos and try to place it in the center of the clay. I make a 3d image file of the symbol I want and have the symbols printed from a 3d printer, they are made with a stiff, durable plastic and can hold very fine detail as we will see with the lettering.
Once I get the symbol positioned where I want it I carefully press it down into the clay. Taking the symbol off the clay is a tricky business and I have to be careful not to mess it up at that point. But once I get the symbol off the clay, the impression it leaves is really wonderful.
At this point I take my 4 inch circular cookie cutter and position it over the impressed image on the clay making sure, as best I can, that the image is centered. Then I press down creating a perfect circle with the symbol centered.
After I press the cutter down I remove the clay surrounding it.
What do I do with that cut off clay? I put it in the plastic bag to keep it moist while I am working. Then after using the entire 25 pound block, I take the clay in the bag and knead it together and make more symbols. I waste very little clay if any.
Once the symbol is made I transfer to the drying sheet. I very gently remove the cutter at that point.
I can fit 8 symbols comfortably on each drywall sheet.
Once I get a sheet full I put a section of the newspaper over it and put on my drying rack. Here you can see where I have 4 drywall sheets drying with the newspaper over it. I put the newspaper over it so the clay will dry slowly. If it dries too fast it will crack.
When working with the symbol stamp the clay is very 'wet' and pliable. So when I first put them on the drying rack I let them dry for about 2 days. It takes that long before they are dry enough and I can handle them to do the next step.
In the next photo the piece on the left is after I have first made it and took the cutter off. Using the cutter makes a nice circle for sure but it also leaves me with a sharp 90 degree edge on top and bottom of circle. I really want to smooth that out and have it be like the image on the right, nice and rounded and smooth.
So to get the nice roundedness I want I take a small sponge and a container of water and smooth out the edges. I have to keep the sponge wet and constantly washing it out.
In the next photo you can see the final clay's shape. The rounded dome effect is created by the throwing down of the clay at the beginning of the process.
The next image really shows how nice they come out, perfectly smooth and round.
Here is a relative size shot. The clay will shrink while drying. The pieces start out 4 inches in diameter but end up a little more than 3 and 3/4 or 3 and 7/8's. But that size is after it has been bisque fired. Bisque firing is the first firing in the kiln where the clay gets to 2,000 degrees Fahrenheit.
Before I bisque fire however, the clay has to be bone dry. The moisture in the clay takes a while to evaporate out totally. So after I smooth the symbols with the sponge I leave them in the garage without the newspaper on them for another two days. Then I bring them in the art studio inside my home to dry out the rest of the way. Typically where I live in Florida the relative humidity is always very high so bringing them inside with the ac on is a better deal and helps the dry out faster.
In the art studio I have these wire racks (above) where I put the clay. They dry good with the air being able to circulate around them. Here's the thing about making sure the clay is dry enough before the first firing. If it is not dry enough with the kiln heats up the piece past the boiling point of water at some point the moisture in the clay will expand and crack the piece apart. I hate to say it but when I first started to make these ancient symbols I thought I had the clay dry enough to fire. I loaded a full load into the kiln and fired it and every single piece had cracked and fell apart. Ever since then I am very cautious about making sure the work is dry enough.
Something else interesting in the photo above is you can see where there are some very white symbols on the shelf below the grey ones. The white earthenware dries to a light grey color but after the first firing it turns white.
The next photo a better look at the wire shelves I have where I dry the symbols and keep the glazes. My beautiful wife, Cathy, who is an excellent artist, makes pottery. She primarily uses terra cotta clay to make plates and bowls with her own designs on them.
A closer look at some of Cathy's work.
At this point I have the clay symbols drying. Because of the compactness of the way I make them it takes a while to dry. They are about 3/4 of an inch thick and a rule of thumb is to let them dry about 2 weeks before the first firing.
After I get the dry enough I will post about that first firing step.


Comments
Post a Comment